
Did this ever happen to you? You realized that you had mistakenly deleted a file – either through the Del key, or using
rm in the command line.
In the first case, you can always go to the Trash, search for the file, and restore it to its original location. But what about the second case? As I am sure you probably know, the Linux command line does not send removed files anywhere – it REMOVES them. Bum. They’re gone.
Suggested Read: How to Recover Deleted Files/Directories Using Scalpel Tool
In this article we will share a tip that may be helpful to prevent this from happening to you, and a tool that you may consider using if at any point you are careless enough to do it anyway.
Create an alias to ‘rm -i’
The
-i switch, when used with rm (and also other file-manipulation tools such as cp or mv) causes a prompt to appear before removing a file.
The same applies to copying, moving, or renaming a file in a location where one with the same name exists already.
This prompt gives you a second chance to consider if you actually want to remove the file – if you confirm the prompt, it will be gone. In that case, I’m sorry but this tip will not protect you from your own carelessness.
To replace rm with an alias to
'rm -i', do:
The alias command will confirm that rm is now aliased:
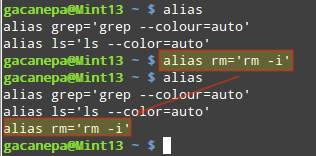
Add Alias rm Command
However, this will only last during the current user session in the current shell. To make the change permanent, you will have to save it to
~/.bashrc (some distributions may use ~/.profile instead) as shown below:
Add Alias Permanently in Linux
In order for the changes in
~/.bashrc (or ~/.profile) to take effect immediately, source the file from the current shell:
Active Alias in Linux
The forensics tool – Foremost
Hopefully, you will be careful with your files and will only need to use this tool while recovering a lost file from an external disk or USB drive.
However, if you realize you accidentally removed a file in your system and are going to panic – don’t. Let’s take a look at foremost, a forensics tool that was designed for this kind of scenarios.
To install foremost in CentOS/RHEL 7, you will need to enable Repoforge first:
Whereas in Debian and derivatives, just do
Once the installation has completed, let’s proceed with a simple test. We will begin by removing an image file named
nosdos.jpg from the /boot/images directory:
To recover it, use foremost as follows (you’ll need to identify the underlying partition first –
/dev/sda1 is where /boot resides in this case):
where /home/gacanepa/rescued is a directory on a separate disk – keep in mind that recovering files on the same drive where the removed ones were located is not a wise move.
If, during the recovery, you occupy the same disk sectors where the removed files used to be, it may not be possible to recover anything. Additionally, it is essential to stop all your activities before performing the recovery.
After foremost has finished executing, the recovered file (if recovery was possible) will be found inside the /home/gacanepa/rescued/jpg directory.
Summary
In this article we have explained how to avoid removing a file accidentally and how to attempt to recover it if such an undesired event happens. Be warned, however, that foremost can take quite a while to run depending on the size of the partition.
As always, don’t hesitate to let us know if you have questions or comments. Feel free to drop us a note using the form below.
Hi. I’m Designer of Blog Change Yourself. I’m CEO/Founder of Change Yourself. I’m Creative Art Director, Web Designer, UI/UX Designer, Interaction Designer, Industrial Designer, Web Developer, Business Enthusiast, StartUp Enthusiast, Speaker, Writer and Photographer. Inspired to make things looks better.
0 commentaires:
Enregistrer un commentaire